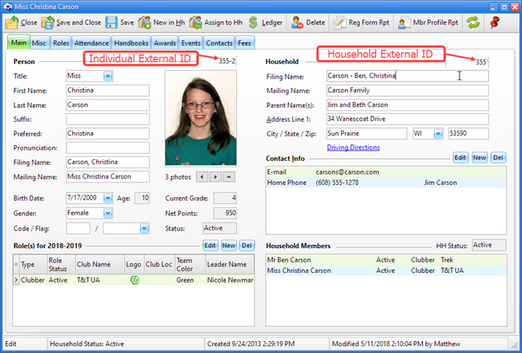
The Main tab of the Member Window tracks basic Member, Household, and Contact information and provides a list of Household Members.
Member
| • | (Optional) Member External ID - ten character text field to reference an ID from an external source (such as other software used to track church members). To make it visible, under Admin > System Settings > Options > Members, choose "Show the external ID fields on the Member form". |
| • | First Name, Last Name, Suffix, Preferred - self explanatory! |
| • | Pronunciation - text box for a phonetic spelling of a difficult-to-pronounce name. |
| • | Photo - displays the primary photo. Multiple photos can be kept for a member. Use the navigation buttons below the frame to view other photos or add a photo. |

|
Double click the frame to open the Photo Manager for more photo options.
|
| • | Birth Date - Age and Current Grade will be calculated and are read-only. |
|
The Grade can be changed in the Role if needed.
|
| • | Gender - set automatically if a gender specific title is used, but can be selected manually. |
| • | Net Points - read-only field derived by calculating all of a members points for attendance, visitors, sections, etc. Spent points (entered through the Club Store) are deducted from the running total. |
| • | Code - five character text field to discretely categorize or tag members. Any unique codes can be used, but it is important for leaders to know what they mean. For example: |
"M" to indicate there are medical issues
"B" to represent all clubbers who come with the bus ministry
"L" to represent someone in law enforcement (leaders obviously) that could be called on if there was a security concern
|
In addition to being a column on the main Clubber grid, it is used on many Report dialogs to enhance selection criteria. It can optionally be printed on the Name Tags.
|
| • | Flag - 6 color options. This is a custom way to categorize or "flag" particular members. Like the Code field, this provides a discreet way to identify members. For example, a Red Flag could be used to identify clubbers from a broken home where there might be a security concern. A Blue Flag could be used to identify clubbers with a learning disability or behavioral problem. Members who need a new name tag printed, who owe money or are missing paperwork could be flagged. Note: unlike the Code field, this field is not used on report dialogs to enhance selection criteria. The Flag column can be made visible on the Clubber, Leader or Check-in grids. |
| • | Status - read-only. A person's status is determined automatically based on the status of the roles in the current club year. Statuses include: Active, Archived, Graduated, Inactive, Prospect or Visitor. |
Role(s) for the Current Club Year
| • | This roles grid is read-only and provides summary information about the role(s) for the current member in the current club year. Use the Member's Roles tab to see all roles as well as additional information for each role. |
| • | To change a role record, select the record and then click the Edit button or double-click a row in the grid. This opens the Roles dialog which allows changes to the role. |
| • | To add a role, click the New button. |
| • | To remove a role, select the record and then click the Delete button. |

|
When a role is deleted, all of the data associated to the role (attendance, team assignments, etc) are also deleted. Before deleting a role, first consider editing it.
|
|
There is also a right-click popup menu available in the grid to Edit, Add or Delete roles.
|
Household
| • | (Optional) Household External ID - ten character text field to reference an ID from an external source (such as other software used to track church members). To make it visible, under Admin > System Settings > Options > Members choose "Show the external ID fields on the Member form". |
| • | Filing Name, Mailing Name, Parent Name(s) - filled automatically using the following defaults, but can be edited. |
| • | Household Filing Name: Last Name followed by a dash and a list of all Preferred (First) Names. Example: "Green - Sandy, Michael, Tina". In households that have persons with different last names, the last names are listed in alphabetical order, separated by "/". Example: for Rebecca Brown, Chad Smith and David Smith: "Brown/Smith - Rebecca, Chad, David". |
|
To re-derive the Household Filing Name, delete the current value and TAB out of the field.
|
| • | Mailing Name: Last Name + "Family". |
| • | Parent Name(s): Mr. and Mrs. + Last Name. |
| • | Address Line 1 - street address. |
| • | City, State, Zip - defaults to the City, State and Zip of your church, but can be modified. |
|
Also under Admin > Options > Members, choose to "Overwrite City and State values when the Postal code changes and a match is found in the lookup table". If City, State, and Postal Code values are specified under Admin > System Settings > Generic Lookups > City, State, Zip, the City and State fields can be skipped to type a zip code. The City and State values will then be filled in. To make this the default, choose "When tabbing through the address fields, skip the City and State and go directly to the Postal Code field".
|
| • | Driving Directions - opens a dialog with a text box to track directions. Click Print Preview for a formatted report that includes contact information. This can be useful for a bus ministry. |
Contact Info
| • | The contact grid is read-only and provides summary information about the contact records for the household. |
| • | To change a contact record, double click a row in the grid or select a row in the grid and then click the Edit button. This opens the E-Contacts dialog which allows changes to the contact records. |
| • | To add a contact record, click the New button. |
| • | To remove a contact record, select the record and then click the Delete button. |
|
There is also a right click pop-up menu available in the grid to Open the E-Contacts dialog or Delete contact records.
|
Household Members
| • | This grid lists any other members in the database associated to the household. |
| • | To open another member's record, double click a name in the grid or use the right click pop-up menu. |
| • | To add a new Household Member, use the New in Hh button in the toolbar. |

