Using the Windows App in Kiosk mode |

|

|
|
Using the Windows App in Kiosk mode |
|
|
Using the Windows App in Kiosk mode |
|
|
|
Using the Windows App in Kiosk mode |
|
|
The Windows App can be set up to handle basic check-in of members at a kiosk. Kiosk mode opens a simplified check-in dialog in full-screen mode. There are three simple steps to checking in members:
Step 1: Search for the family: type a few characters of a family name or the last 4 digits of the primary phone number, then press Enter or click Search. Matching family records are displayed for selection.
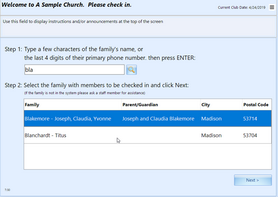
Step 2: Select a family: click a row to select the family with members to check-in; click Next.
|
If only one family meets the criteria, the database will use that family's information and go to Step 3. |
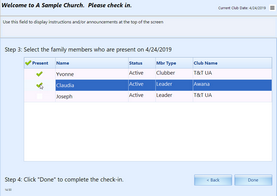
Step 3: Select the family members who are present on the Current Club Date. Click Back to return to the previous screen if needed. Click Done when finished.
In order for kiosk mode to be launched, there must be a User record with an Account Type of "Kiosk". The user record can be for a person authorized to set up the kiosk, or for a specific computer used as the kiosk. (For example, user name "Lobby" or "Lobby 1").
When logging in with an account type of "kiosk", the kiosk dialog opens full-screen. Once logged in, preferences can be set by using the menu button in the upper right corner and selecting Admin Options from the drop-down.
|
To access admin options, the name and password of either an Admin or Kiosk user must be provided. |
The following items can be customized:
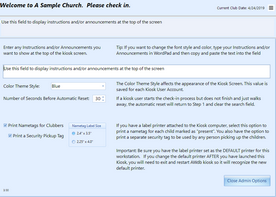
Instructions/Announcements - the text that will be displayed at the top of the kiosk screen
Color Theme Style - this value is saved for each Kiosk User account
Number of seconds before automatic reset - after the set number of seconds of inactivity, the screen is reset to Step 1, clearing any other data from the screen
Print Name tags for Clubbers - check the box to enable printing, then select a Name tag Label Size in the box. A separate label will print for each clubber and will include First and Last name, Club Name, club location, and primary phone number (including the contact person's name) along with a security pickup code and a current date and time stamp.
Print a Security Pickup Tag - if clubber name tags are printed, a parent pickup label can optionally be printed as well. The parent label lists all clubbers in attendance along with the security pickup code.
|
Be sure the label printer is set as the DEFAULT printer for the workstation. If the default printer is changed after launching the Kiosk mode, exit and log in again in order for the Windows App to recognize the new default printer. |
Exit kiosk mode by using the menu button in the top right corner and selecting one of the following:
Exit Kiosk mode and Switch Users - exits kiosk mode and launches the log-in dialog to allow log in as a non-kiosk user
Exit the application - closes the kiosk dialog and shuts down the database
|
To prevent the database from being shut down by an unauthorized person while in kiosk mode, a user name and password must be provided from an Admin or a Kiosk user to exit. |