Users |

|

|
|
Users |
|
|
Users |
|
|
|
Users |
|
|
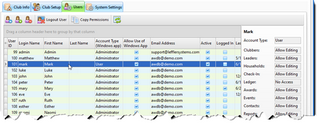
![]() The Users tab manages the names and account information of those authorized to access the cloud database. The first admin user is created during the initial setup process. Additional user accounts can then be added.
The Users tab manages the names and account information of those authorized to access the cloud database. The first admin user is created during the initial setup process. Additional user accounts can then be added.
We recommend creating user accounts for each individual person who needs access to the database. Specific permissions can (and should) be set for each user. Each user can select a unique style (skin) and have saved customized grid layouts. Most records are user time-stamped when they are created and/or modified. Having separate user accounts for each person provides a way to investigate changes made to the data.
|
Do NOT use generic user accounts that are shared by more than one person. Users could overwrite other user's settings and grid layouts. You will also lose valuable information related to creation and modification of records. |
Icon |
Action |
Description |
||||
|
Open User |
Opens the selected user in the User Account dialog. (Pressing the Enter key with a row selected or double clicking the row also opens the user record.) |
||||
|
New User (Ctrl-N) |
Opens the User Account dialog with blank/default values to create a new user. |
||||
|
Delete User (Ctrl-D) |
Removes the selected user.
|
||||
|
Log User Out |
Logs the selected user out of the database. |
||||
|
Copy Permissions |
Opens the Copy Permissions dialog to use the permissions from one user account to update the values of another user account. |
Creating a new User record or opening an existing record opens the User account dialog.
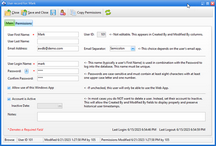
The following fields are shown on the Main tab:
| • | User First Name, User Last Name, Email address - |
| • | User ID - a system assigned ID. This is a read-only field. |
| • | Email Separator - determines the separator to use between e-mail addresses during the Gather E-mail Addresses and Textible Phone Numbers procedure. Choose semicolons or commas. |
| • | User Login Name - name used to log in. We strongly recommend using the person's First Name for this. Generic names like "commander", "sparks", or "FBC" should NOT be used. The User Name is not case-sensitive so "Matthew" is the same as "matthew" as far as the log in screen is concerned. |
| • | Password - password for the user to log in. The password IS case-sensitive, so "PassWord" is not the same as "password" to log in. Whatever the password is set to here, the exact same value must be entered on the log-in screen. Don't use "awana" for your password, everybody guesses that one! |
| • | Confirm Password - confirmation of the password entered above. |
| • | Allow use of this Windows App - if unchecked, this user will only be able to use the Web App. |
|
Permission to "Allow use of the Windows App" can also be set in the Web App. For User accounts created in the Web App that allow access to the Windows App, default permissions for the modules will be set but should be updated on the Permissions tab of the User record in the Windows App. |
| • | Account is Active - indicates the status of the user account. If a user no longer needs access to the database, instead of deleting the account, clear the box. |
| • | Inactive Date - date the account became inactive. |
| • | Note - any additional information or notes related to the user account. |
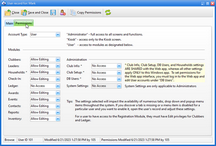
The following fields are shown on the Permissions tab:
| • | Account Type - determines access to the database. Select "Administrator", "Kiosk" or "User" from the drop-down list. An "Administrator" has full access to every screen and function, including System Settings. A "Kiosk" account can only access the Kiosk screen. A "User" account allows setting specific permission for each Module. All users can change their own passwords by selecting Tools > Change Password from the Main menu bar. |
| • | Modules - lists each module in the Windows App. For the main modules, set permission to Allow editing or No Access. Under the Administration module, set permissions to Allow editing, Read Only, or No Access. (Access to System Settings is only available to Administrators.) |
|
The selected setting impacts the availability of numerous tabs, drop-down lists and pop-up menu items throughout the system. If an item is disabled for a user, adjust the permissions. |
|
Permissions for the individual modules can only be set when the Account Type is User. Administrators have access to everything. Kiosk users are limited to Check-in items in Kiosk Mode. |
|
Under the Administration module, Club Info, Club Setup, and Users permissions will apply to the Web App and the Windows App. All other permissions only apply to the Windows App. Permissions relating to the Web App need to be set in the Web App. |