The Check-in Module |

|

|
|
The Check-in Module |
|
|
The Check-in Module |
|
|
|
The Check-in Module |
|
|
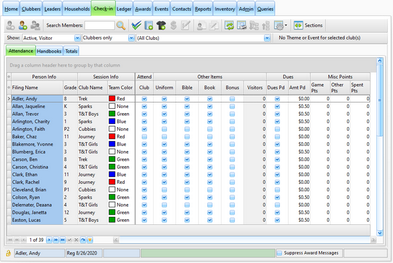
![]() The Check-in Module provides a way to quickly and easily track Attendance, Dues, Offerings, and other categories such as Uniform, Bible, Book, and Bonus, as well as add Visitors and mark completed Handbook sections. With each click, the section counts and point totals are updated and awards are automatically triggered. The Check-in module efficiently handles the weekly recordkeeping tasks that would otherwise be a very tedious and time consuming job.
The Check-in Module provides a way to quickly and easily track Attendance, Dues, Offerings, and other categories such as Uniform, Bible, Book, and Bonus, as well as add Visitors and mark completed Handbook sections. With each click, the section counts and point totals are updated and awards are automatically triggered. The Check-in module efficiently handles the weekly recordkeeping tasks that would otherwise be a very tedious and time consuming job.
Details on the Check-in Module are divided into four sections: The Toolbar, The Attendance Grid, The Handbooks Grid, and The Totals Grid.
The Check-in grid can be customized to meet different needs of Awana Programs and maximize productivity.
| 1. | Start by showing or hiding the columns based on what is used. For example, if Church Attendance is not tracked, hide the "Attend Church" column header. If weekly Dues payments aren't tracked, hide the "Dues" header band so all dues-related columns are hidden. |
|
When choosing to hide columns, be sure to understand the difference between a header band and a column header. In the above graphic, one header band is labeled Other Items. Beneath this header band are column headers for Uniform, Bible, Book, etc. Hiding a header band causes all its column headers to also be hidden. |
| 2. | To use the Custom1 and Custom2 check box columns, set the point values and customize the Display Names under Admin > Club Setup > Club Names, Logos, Dues and Points. |
| 3. | Resize column widths by dragging a column header or a header band's right edge to the left or right. For example, if the Church Attendance column is hidden, the Attend header band can be resized so it is more narrow. |
| 4. | Save the custom settings! After making adjustments, click the Grid button in the toolbar and select Save the current grid layout to ensure the grid is set-up the same way after the next log in. |
|
The customized grid settings are saved per user. Each user can (and should) set preferred grid layouts. Each person using the database should have an individual User Account with a unique name and password. |
Additional customizations can be made each week to accomplish specific tasks. Here are some examples:
| 1. | When entering data from worksheets that are organized by Club Name, use the toolbar's Show: club name drop-down check list to limit records to one club at a time. For example: To record attendance and handbook sections only for Sparks clubbers, select "Clubbers" and "Sparks" in the Show: drop-down lists. Once data entry for Sparks is completed, select another club name, like T&T, to continue data entry for the next group. |
|
If you always limit the records displayed to a single club, hide the Club Name column to reduce horizontal scrolling. |
| 2. | When entering data from worksheets that are organized by Team Color for a single Club, after selecting the specific club to Show, group the records by Team Color. |
|
Grouping by Team Color makes it easy to enter Game Points (if those are tracked). Also, statistics are shown for each node (in this case, each Team Color). |
| 3. | When entering data from worksheets for handbook section completion, filter the grid to show a selected Primary Handbook (like Grace in Action, or Appleseed). Further filter the grid to show those who attended on the given club date (Attend = true). This makes it it easy to multi-select records and mark the same handbook section for all members at once. |
When the specific task is completed, use the Grid button's Reset Grid Layout to return to your custom grid settings.